Two years ago I developed a software app called SkySaw for use on my teaching shift at the COEGM. SkySaw allows clinicians to structure patient encounters as a linked network (technically a directed acyclic graph). What made this attractive was that these individual networks could be connected together into a great network. One could then use graphing tools to data-mine relationships, trends and outcomes. As the first stage of Opus23 Pro moves to completion, I decided to port this app over to Opus. What follows is the online doc file for PROTO, the Opus 23 app.
PROTO allows you to develop a flow-chart (network) based approach to health protocol management. Creating a protocol network in PROTO is easy. Protocols can then be added to the client report, allowing for a more client-friendly way of relating your clinical decisions.
Actions are classified by various roles you can assign any node:
![]()
Just choose and option from the menu at the top right-window:
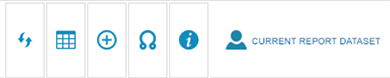
From left the right, the options are:
- Reset the screen: Ticking this will reset the screen and zoom level. You can zoom in and out by using the scroll function of your mouse. You can move the network around by click-grabbing the network and moving your mouse.
- Back to protocol dataset list: Ticking this will return you to the list of datasets for the various protocols you’ve created
- Add a new node (plus sign): Ticking this will launch a popup window that allows you to add a new node to the network. You then give the node a name and a type (food, drug, molecular target, lab test, etc.) and if you wish provide a short bit of accompanying text.
- Add a new edge (two connected nodes): Ticking this will launch a popup window that allows you to add a new edge to the network. Edges connect nodes. The input fields will autosuggest nodes to use based on the existing nodes in the network.
- Info screen: Ticking this will launch this popup window.
- Active dataset indicator: This icon shows if the protocol you are working on is the active dataset (i.e this is the protocol that will go on to be included in the client report, if you desire.)
Editing nodes and edges: You can edit any node of edge in the map by clicking on it. This will launch the appropriate popup that will be populated with the existing data. You can make any changes and then save.
Map direction: The map is designed to proceed in its development from left to right.
Adding nodes on the fly: Certain node types (molecular targets, agents and foods) can be added from their own information popups. For example, clicking on any gene symbol in Opus 23 Pro launches the gene information popup for that gene. Clicking on the ‘add to protocol’ icon

will add that gene to the current protocol as a ‘molecular target’ node.